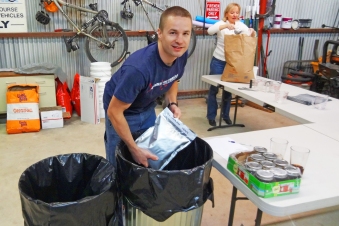
 Before you shop for Mylar products, this article will help you review the basics and answer the five key questions that will jump-start your Mylar food and gear packing project. Once you answer these questions, you will be better able to select the best Mylar bags and products for you and your situation.
This summary, which also includes the pros and cons of various Mylar-related products, as well as the basic foods to pack, can equip you with the knowledge needed to make informed choices. This article will help you select the best Mylar packing method for you, and also the best Mylar products and food for you and your situation.
Our Objective: We want you to be able to establish a long-term supply of food that is easy to bring together, has a long shelf-life, is both nutritious and tasty when it comes time to eat it, and is affordable to assemble. We want it to be easy—so you won’t delay implementation.
With this series of articles on emergency food, we want to equip you with what you need to make sound decisions. We want to help you select the products you need so that you can move forward quickly. Since we don’t know when an emergency situation will strike, we want to help responsible people prepare. Please establish a plan and timeline for implementation.
For some it’s counterintuitive, but when we work together on projects such as this, we can become more independent and self-reliant. Today, it’s never been more important to be self-reliant and equipped for change.
The Basics: What you will need for this Mylar packing project.
By using Mylar, the task of repackaging food to extend its shelf-life for long-term storage and safety is simple and straightforward. Only a few ordinary tools are needed, along with a clean, sanitary area to work.
This same Mylar bag packing process can also be used to protect electronics, firearms, medical supplies, and other gear as well. But there is one crucial difference. Most non-food items should be packed with desiccant packets, whereas most foods should be packaged with oxygen absorbers.
Details and purchase recommendations can be found throughout this article. The links contained here will take you to specific products and reasonable prices, but feel free use the links as a shortcut for shopping with other vendors. But be careful. Everything sold online as “Mylar” is not truly Mylar.
List of Supplies and Gear (Additional details at the end of this article.)
- Mylar Bags (Details provided below.)
- Oxygen Absorbers (Details below.)
- Glass Canning Jars: Several glass jars with lids and good seals, such as canning jars, are needed to protect the oxygen absorbers which you will be adding to each Mylar bag.
- Heat-Seal Tool: Once filled with food, each Mylar bag needs to be heat-sealed. This process requires high heat to melt the bag material so that it completely bonds, forming an airtight seal. This heat can be applied using either an ordinary household clothing iron, a flat hair-iron, or a Mylar bag heat-sealer. (Details below.)
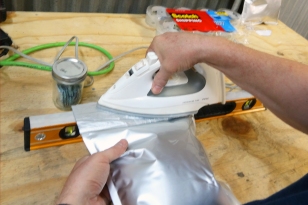 Metal Carpender’s Level: If you are using a clothes iron to seal your Mylar bags, you will also need a metal-edged carpenter’s level or some similar metal object. Its purpose is to reflect the iron’s heat back onto the opposite side of the bag to ensure that both sides of the bag bond together. (See photo on the right.) This is not needed if you will be using a Mylar Sealing Tool or a Hair Iron as these have two heated surfaces.
- Table: A smooth work surface in a clean area is needed for your workspace.
- Measuring cup or kitchen scale.
- Felt pen or Sharpie, and paper, to label each Mylar bag, indicating its contents.
- Clear packing tape, 2-inch wide, to protect the label.
- Steel Container, or a safe place to store your packed Mylar bags after they have been filled with food or gear.
For specific product recommendations, follow the links contained in this section. Additional links and details can be found in the three companion articles, “Overview of D-I-Y Food Options to Achieve 25-35 yr Self-Life,” “Mylar Bags: Before You Start,” and “Mylar Bags: Step-by-Step Instructions for Packing Food and Emergency Supplies.” And, the book, “Prepared, Ready to Roll,” by SIG Swanstrom, includes valuable information on food and other related subjects.

The Five Key Questions You Need to Answer Before You Shop
Your answers to these five key questions will help you select the best methods and Mylar products for you and your needs.
 Question #1: What weight Mylar bag is best?
Note: The thickness, or weight of the Mylar material, is measured in ‘mils.’
For those who are trying to attain the longest shelf-life, 7.5 mil (heavy-duty) 1-gallon Mylar bags are the best all-around choice, but 5-mil bags are almost as good. In any case, the thickness (mils) of the Mylar material used to make the bag, and the size of the bag, is best dictated by the type of food being packed, the puncture-resistance needed for the contents, the sealing method which will be used, and the durability required for the anticipated handling, transport, and the storage method that will be used.
For most of us, this equates to 5-7 mil bags because these provide added protection at a minimal extra cost. Using a 7-mil bags provide redundancy; an added level of protection.
Pasta and Sharp-edge Foods: However, thick, heavy-weight bags (7-7.5 mil) are necessary for packaging foods such as pasta, which often has bag-puncturing sharp edges. For soft-edge products such as rice, 5 mils are okay. The much thinner, 3.5 mil Mylar bags are the most popular, but they are only minimally adequate.
If you must use a thin bag (3.5 mils) for hard-edge products, wrap the food in a layer of thin cardboard, or open both ends of the product’s original package and then crush the package to eliminate its hard corners. Insert the food into its crushed original package, and place both the product and its package into the lightweight 3.5 mil Mylar bag. This will help reduce the puncture problem.
Better yet, routinely use thicker bags. We recommend using 5-7 mil bags for everything. The thicker the Mylar, the better the protection.
Yes, heavy-duty Mylar bags (7-7.5 mil) are a bit more expensive to purchase, and yes, they are more difficult to seal if you are using a household clothing iron, but if you can make it work, use the heavy-duty bags.
Recommendation: We recommend using heavier-duty (5 – 7 1/2 mil) Mylar bags to package everything. Why? The more heavy-duty the bag, the better the durability for long-term storage. Heavy-duty 7 or 7-1/2 mill Mylar bags provide a substantial increase in puncture protection, improved durability for mishaps as well as unforeseen long-term storage and stacking problems. And, they also greatly increase long-term oxygen and moisture resistance. Lastly, it’s better from a logistics point of view to purchase just one type of bag and use it for everything.
Mid-weight Mylar Bags: 5-mil bags are not as durable as the 7 mil varieties, but still a satisfactory choice, especially if you will be using a clothing iron or hair iron to heat-seal the bag. However, if you plan to pack more than 50-pounds of food and you can afford to purchase a $100 heat-sealer, buy a Mylar-sealing tool, regardless of the thickness of the Mylar.
Cost Saving: If cost is an impediment to moving forward with this project, it’s okay to use 3.5 mil bags. They work fine. You will just need to handle and store them more carefully. And, if you use 3.5 mil bags, your packing efforts will probably not produce a 35-year shelf-life. Nonetheless, it’s better to have an ample food supply than a small one, so if you need to save money by purchasing lightweight bags, do it. Just make sure you are buying genuine Mylar bags and not just foil bags.
The rule of thumb is that when possible, use the thickest Mylar bag that will work for you and your situation.
![]() Question #2: What is the best size Mylar bag?
Question #2: What is the best size Mylar bag?
Top-Choice Size for Mylar Food Packing: 1-Gallon 7.5 mil Mylar bags or 1-gallon 5-mil Mylar bags are the best choices for all-around use in food packaging. The next commonly used size used by knowledgeable packers is 7-mil 1-quart bags or 1-1/2 quart 5-mil bags, but the cost of these is nearly the same as for the 1-gallon size. So, if cost is an issue, stick to 5-mil 1-gallon size bags as you will be able to package more food for less money. The packing process will be faster, too. If a ½-gallon bag is occasionally needed, cut a 1-gallon bag in half to create two bags.
7 mil 1-Gallon and 5 mil 1-1/2 gallon Mylar bags deliver the best compromise between pound-to-pound cost of packaged food, time spent filling/packing/heat-sealing the bag, ease of transport, storage space required, overall durability, and convenience when the times comes to use the packed food. Though popular, 5–gallon Mylar bags are heavy to move around and transport, even when used inside a 5-gallon bucket. They are also space-inefficient for storage.
Top-Choice Mylar-Bag Size/Style for Convenience: When the time comes to eat the food, the medium weight 1-1/2 Quart ziplock-style Mylar bag may be the most convenient size. For couples and those with young children, 1-1/2-quart ziplock-style Mylar bags are easier to handle, and spills are less likely since it is easy to secure the bag after it has been opened. But, when compared to the comparable time needed to pack food into a larger bag, and the pound-to-pound cost of packaging food, these 1-1/2 quart bags are convenient to use but a more expensive choice.
Filling and sealing a Mylar bag requires nearly the same amount of time, regardless of the size of the bag. So, though smaller bags are easier to handle, they do represent a more time-consuming packing process. Still, this may not be a problem unless you are packaging a large quantity of food.
Packing-Time Comparison: Using 1-1/2 quart Mylar bags rather than the 1-gallon size, requires 3x more packing time to package the same quantity of food. For some people, the benefits are worth the extra time, but most favor using larger bags.
Smaller-Size Bags. Though 1-gallon, 1-1/2 quart, and 1-quart bags are the ‘standard’ sizes favored by most knowledgable packers, smaller bags can be very useful for packing items such as spices, gravy, sauce and soup mixes, drink mixes, condiments, bouillon, yeast, vitamins, medicine, small quantities of freeze-dried meat, or anything else that you might want to package in smaller quantities.
However, even when packaging smaller quantities, we recommend using 5 mil or heavier Mylar bags. Not only are they stronger than lightweight bags, but over many years of storage, the heavier-weight bags provide greater resistance to oxygen and moisture penetration. Don’t forget, small bags still need to contain an oxygen absorber.
Bag-in-Bag Mylar Packaging: If a small Mylar bag will be packed inside a larger Mylar bag, and the purpose is simply to keep the items separated, such as including spice packets and seasoning mixes with another food, then a lightweight bag is wholly suitable for use as an inner bag. But even in this situation, the small inner bag must contain an oxygen absorber.
Giant-size Mylar Bags. Larger size Mylar bags, such as 5-gallon liners designed for plastic buckets, are not generally a good choice for food. Even if a ziplock-style 5-gallon Mylar bag is used, often the food will spoil before that quantity of food can be consumed.
Moreover, if the seal on a 5-gallon bag fails, or the bag is punctured somehow over many years of storage, more food will be lost to spoilage. And, if emergency evacuation becomes necessary and your food needs to be moved, only able-bodied adults can help. Even if the 5-gallon Mylar bag is in a plastic bucket that has a handle, many young and old potential ‘helpers’ will not be able to assist. Also, less food can be transported by vehicle because these large containers are not space efficient.
Redundancy and Increasing Protection. On the other hand, using a 5-gallon Mylar bag as a liner is a technique used by those who want their food supply to be highly mobile and double-protected. With this technique, the food itself is typically packed in 1-quart Mylar bags or stacker bags, and once sealed, these are tightly packed into the Mylar lined 5-gallon bucket.
This “double-bagging” provides a redundant level of protection for the food. Both the 5-gallon Mylar bucket liner and all the food bags, are heat sealed and contain oxygen absorbers. This bag-inside-a-bag method is also useful for storing pre-made Emergency Meals meals. (Described in the section which follows Question #5.)
 Question #3: What ‘style’ of Mylar bag should you buy?
If you are ordering your Mylar bags online, you will discover that in addition to the standard Mylar envelope (bag), there are various specialty bag options. Most people find these improvements unnecessary, but to avoid confusion, we have included the various Mylar bag options.
Standard 7.5 mil 1-Gallon Mylar Bag. If you can find them, purchase a bag made from a single piece of Mylar. These bags are made by folding a single sheet of Mylar in half and then heat-sealing the two sides.
Note: The below bags are filled and sealed the same way, but each style provides additional features. These added features are not needed, but some find them to be desirable.
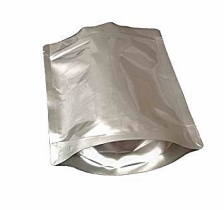 Gusseted Bag. Those who find themselves alone when undertaking this packing project, generally use a stack of books or a bucket to prop-up one side of the bag as they fill it. Since a standard Mylar bag is really an envelope, it doesn’t naturally stand upright for filling. But for those who are not satisfied with this solution, gusseted bags are constructed with a flat bottom, so they are more easily filled without support or a helping hand. The downside is the added expense, and that these bags have additional heat-sealed seams, and seams are the weak spot in Mylar bag construction. However, such leakage is unlikely, but it is something to consider.
Regardless, some prefer this style of bag, especially those who are packing premade recipes designed to be mixed with hot water in the same bag. For on-the-go eating, being able to eat a pre-prepared meal out of the same container is obviously advantageous. A mixed-food bag such as this is essentially a do-it-yourself backpacker’s meal.
Note: When compared to Department of Defense standards, commercially-produced backpacking and emergency meals only provide about half of the calories required for an active adult. The US Department of Defense has determined that military meals should contain 3,600 calories; 100gm protein and 440gm carbohydrates. (For more on this topic, read “PREPARED, Ready to Roll: Evacuation, Safe Haven, and Shelter-in-Place Guidebook” by SIG Swanstrom, pg 303-328, 487-488).
With this in mind, if you intend to make your own ready-to-eat meals, you may want to increase the amount of food, and calories, contained in each bag. If you are contemplating making any kind of premade meals, consider adding additional Mylar envelopes in the same bag which contain other food items, such as those included with military MREs (meals, ready-to-eat). Simple things such as a little Mylar envelope containing spices, salt, pepper, instant coffee, and even vitamin enriched hard candy such as KABANG or nimm2. These small additions can provide a big morale boost.
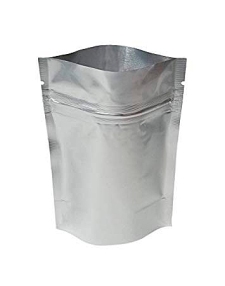 ZipLock-style Bag. This style of Mylar bag is an example of a great idea that is not adequately implemented by most manufacturers. Unfortunately, many of these Mylar bags have insufficient space above the ziplock to seal the bag without harming the ziplock closure. Thankfully, there are a few manufacturers who get it right, but most do not, so ‘buyer beware.’ On the ‘plus’ side, this is a nice feature if the manufacturer has designed the bag to have at least 1-inch of sealing space above the ziplock closure.
Nonetheless, most people find the added expense of this type of bag to be unnecessary for routine packing. Yet, it is a noteworthy feature and may be worth considering. Consider this option if your food supply will include many different types of food, and you will likely open an assortment of food bags to facilitate variety in your diet. Being able to reseal the bag will help you avoid spills, and help keep out ants and other insects.
Tamper Resistant Ziplock / aka Security Bags. Similar but a much better design than the standard zip-lock Mylar bags, these are manufactured with a ziplock top that is pre-sealed, with the bottom left open for filling. Once the bag is filled, the bottom is heat-sealed like a conventional Mylar bag. This design offers the best of both worlds, but they are more expensive.
Textured Foil-Channel Vacuum Bags. Made for use with vacuum sealing machines, this style provides the benefits of the Mylar material with the added advantage of vacuum packing.
Note: A vacuum machine may be able to seal a standard-style Mylar bag, but it will not be able to pull a vacuum on it. For that, the interior of the Mylar bag must be texturized with channels to facilitate the removal of air.
Note 2: It is still necessary to add oxygen absorber packets to vacuum-packed bags. The benefit of vacuum sealing a Mylar bag that contains an oxygen absorber packet is that it offers redundancy. Though vacuum-packing of a Mylar bag isn’t necessary, it is an example of adding an extra margin of safety, a feature that is always desirable.
Professional machines may work, but lower-cost and consumer versions of vacuum sealing machines will generally not seal heavy-duty Mylar bags. If you already have a machine, we recommending testing it before you purchase quantities of supplies. If you plan on purchasing a vacuum sealing machine, check the specifications and reviews to make sure it is capable of heat-sealing 15 mils of Mylar.
Colored Bags. Mylar bags that are manufactured using a black, white, blue, red, and other colored materials are not otherwise different from those which are the natural silver color of Mylar. If you have a reason to use colored bags, even aesthetics, that is fine but even expensive colored bags do not improve the bag’s food storage characteristics.
Buyer Beware: Many colored bags sold as Mylar are knock-offs and are not constructed of genuine Mylar. Also, do not use vented, aka ‘pressure-valve’ bags made for coffee as they are not airtight.
Clear Front or ‘Window’ bags. Do not use clear-front Mylar bags for long-term food storage. The clear panel does let you see what’s packed in the bag, and this may seem like a useful feature, but it compromises the bag’s ability to protect the food. Do not use window bags for long-term food storage.
Odor Proof. With many companies, this is more of a marketing scheme than a feature which differentiates one Mylar bag from another. When properly heat-sealed, 7-mil genuine Mylar bags are odor proof. A Ziplock-sealed bag that is odor-proof without being heat-sealed is unlikely.
Gun Bags. Though some gun storage bags such as the Zerust Rifle Bag and Zerust Handgun Bag are impregnated with rust inhibiting chemicals, a standard heavy-duty Mylar bag with desiccant packets added, will likely provide better protection. We have not tested the Zerust product, but since they only claim “up to five years” of protection, even their optimal-level of protection is far less than what you can expect from heat-sealed heavy-duty Mylar.
A properly heat-sealed 7.5 mil Mylar gun bag, such as the ShieldPro Rifle Bag, can deliver 30-50+ years of protection. The ShieldPro gun bag comes with both desiccant packets and oxygen absorbers. However, we recommend adding extra desiccant.
With both the Zerust and Mylar storage methods, the firearm should be cleaned and treated with rust-inhibiting oil such as Boeshield T-9 before packaging. Regardless of whether or not you use a specialty gun bag like Zerust, the inclusion of fresh desiccant and heat-sealing the bag is advisable.
A heat-sealed closure is necessary for long-term storage and adverse conditions, but a ziplock closure may be helpful for bags which you will open and close regularly. But when used alone, this closure will not provide serious protection.
 Question #4: Should you add ‘Oxygen Absorbers’ or ‘Desiccant’?
Oxygen absorber packets are the best choice for packing most foods, whereas desiccant is best for storing gear and non-food supplies.
Food: These small food-safe ‘oxygen absorber’ packets contain pulverized iron powder. After a Mylar bag is filled with food and heat-sealed to create an airtight seal on the Mylar bag, the oxygen absorbers contained inside will remove the oxygen from the air that is trapped in the bag. This helps preserve the food as exposure to oxygen is one of the primary causes of food spoilage.
Gear: Conversely, if you are packaging electronics, metal tools, firearms, ammunition, medical supplies, or other moisture-sensitive gear or food, use ‘desiccant’ packets rather than oxygen absorbers. For more about these two types of absorbers, refer to the following section on ‘Desiccant’ Packets.’
Using Both: Irrespective of conventional knowledge and ‘Internet wisdom,’ you can use oxygen absorbers and desiccant in the same Mylar bag. However, with dry food packed in a normal environment, using both does not significantly improve the shelf-life of your stored food.
What ‘oxygen absorber’ is needed for the different sizes of bags?
Oxygen absorbers must be selected based on the size of the bag you will be using, AND the amount of empty ‘headspace’ (empty space) that will remain in the bag after it is sealed. For example, if 1-quart of food is added to an empty 1-gallon bag, there will potentially be 3-quarts of air trapped inside the bag. As a result of this extra air, you will either need to add additional oxygen absorbers or cut the Mylar to make the bag smaller. The second solution is the best. If there isn’t a good reason to leave the bag as-is, use scissors to trim the size of the bag to make it smaller, and a better fit for the quantity of food that is in the bag.
If the filled bag still contains a lot of air, such as when packing hard curly noodles which don’t pack as tightly as other foods such as rice, add an extra oxygen absorber.
The following recommendations assume that the Mylar bag has been filled or nearly filled with food. If there is a little extra headspace at the top of the bag, no problem. But if there is extra space in the bag, simply apply the heat-seal closer to the food rather than at the top of the bag. Either way, because redundancy has been built into the below recommendations, it is not necessary to be ultracareful about removing all of the air before sealing the bag.
Purchase Advice: Oxygen absorbers sold in vacuum-packed foil pouches will remain fresher than clear-plastic packaging. But even more important, is to have fewer packets in the same sealed package as this will help you keep them fresh. For example, it is easier to keep a hundred 500cc packets fresh when your purchase consists of 10 sealed pouches, each containing 10 oxygen absorbers, rather than a single package of 100 oxygen absorbers.
Choose Oxygen Absorber “cc” Based on Bag Size
1-Gallon Bag: Use 600cc of oxygen absorbers. Either use two 300cc oxygen absorber packets, one at the bottom of the bag, the other at the top. Or, use one 500cc oxygen absorber and one 100cc packet. Though some vendors suggest using less protection, we highly recommend using a minimum of 600cc protection for a 1-gallon bag.
If you opt to purchase 100cc oxygen absorber packets exclusively, because they can also be used in smaller bags, distribute them throughout the larger bags. For example, when using a 1-gallon Mylar bag, you might add two 100cc oxygen absorbers to the bottom before filling it, one 100cc absorber in the middle of the food as you fill the bag, followed by three 100cc absorbers in the mouth of the bag just before it is heat-sealed. The 600cc level of protection remains the same, but distributing the packets throughout the food will marginally increase their effectiveness.
2-Quart Bag: 300cc Minimum. Use one 300cc oxygen absorber, three 100cc absorbers, or one 500cc packet.
5-Gallon Bag: 3,000cc of protection. We recommend using six 500cc packets. Add two to the bag before filling it, two when half-full, and the final two on the top of the food, just before heat-sealing the Mylar bag.
If 5-gallon bucket bag + Mylar bag(s) is utilized as part of a double-container method for high humidity packing environments, or by those wanting an added layer of protection, place desiccant in the bottom of the bucket before the Mylar liner is put in place. Then, use the 3,000 cc oxygen absorber protection inside the Mylar bag.
*** We acknowledge that these quantities of oxygen absorbers are more than the manufacturer’s recommendations, but since oxygen absorbers will continue to work for 35+-years, extra absorption capacity will provide ongoing, added protection. This redundancy provides an added safety-margin; protection which serves as a hedge against pinholes, inadequate seals, and slow leaks which might develop over time.
‘Desiccant’ packets are used for gear, not food.
Mylar packaging is perfect for food, and it is also ideal for the storage of gear and other supplies. Mylar bags are useful for an assortment of purposes. They work as dustproof packaging, to keep together items such as medical supplies which will be used together after the package is opened, for RF security and for added protection of electronics inside Faraday cages, to retain liquids such as lubrication or rust-prevention treatments, humidity protection, and waterproof storage. Mylar is an extremely versatile product.
You can use these same Mylar bag packing techniques for the long-term storage of non-food items such as emergency supplies or gear. But rather than using oxygen absorbers in the bag, these items are best protected by a moisture-absorbing product such as Silica Gel. For more on the topic of desiccant and additional product information, see the companion article, “Mylar Bags: Step-by-Step Instructions for Packing Food and Gear.”
This includes long-term storage of emergency radios and electronics, optics, reference books, firearms, metal tools, medicine, medical supplies, trauma and first aid kits, and anything else that would benefit from durable, protective packaging.
For these gear and supply items, there are various forms of ‘desiccant,’ but the most popular style is Silica Gel with Indicator. It was designed to absorb rust-causing moisture and oxidation and to have a built-in ‘indicator’ which monitors its usefulness. This added feature translates to additional cost, which is unnecessary unless you will be using a ziplock-style bag and periodically opening it.
‘Oxygen absorbers’ only provide minor benefits for long-term gear storage, but ‘desiccant’ is a valuable addition. Medicine, medical supplies, and expensive electronics and optics come with desiccant, but these disposable packets should be replaced with a longer-lasting higher quality product.
Oxygen absorbers and desiccant together in the same Mylar bag. It is an urban myth that they will counteract each other.
Food Exception: Use desiccant packets for the long-term storage of foods such as sugar and salt, and any other food that is particularly susceptible to damage from humidity and moisture.
The Quantity of Desiccant Needed: The amount of desiccant needed will vary by brand and type of desiccant. ‘Silica Gel’ is readily available, comes in many sizes and types of containers, and can be recharged. Unlike oxygen absorbers which are rated using “cc” measurement, desiccant often uses ‘cubic inch’ or ‘cubic foot’ measurements to indicate the volume of space they will protect. As with oxygen absorbers, for long-term storage, we recommend using twice the level of protection cited by the manufacturer.
Recharging Silica Gel. If using Silica Gel packets which do not have a built-in “indicator” of freshness, or when reusing Silica Gel, put the packets on a cookie sheet in an oven heated to 180-degrees. Turn the oven “off” before inserting the Silica Gel packets, and leave them in the warm oven for 2-3 hours. Upon removal from the warm oven, immediately put the packets in an airtight container to keep them fresh until you seal them into a Mylar bag containing gear or supplies.
Whichever brand and type of desiccant you choose, closely read the product label and match the number of desiccant packets/containers needed for protecting the cubic-inch volume of the bag you are using. When in doubt, use more. The amount of desiccant needed is based on the volume of the bag itself, not on the size of the object stored in the bag.
Item(s) to be stored must be thoroughly dry before they are placed into the Mylar bag. Guns and other metal objects, such as hand tools, should be lightly coated with a rust inhibitor such as Boeshield T-9 before putting them in the bag. However, keep liquids such as lubricating oil and rust-inhibiting treatments (liquids and gels), from coming into contact with the desiccant packet/container.
Don’t store oiled guns or tools in the same Mylar bag as electronics and ammunition. And, when storing batteries, keep them from coming into contact with the Mylar bag itself. The positive (+) terminal of each battery must be stored so that it cannot come into contact with the Mylar bag and other metallic objects.
Since Mylar bags have a layer that is a metal foil, they can cause batteries to discharge if a battery terminal is in contact with the metalized surface of the bag. To keep this from happening, wrap and tape your stored batteries in layers of paper, plastic or cardboard, before inserting them into their Mylar storage bag.
An added benefit is that this same solution can help prevent another potential problem, as well. Stored batteries often leak, so this same battery-wrap precaution can also protect your stored items from battery acid.
Advice: Do not use oxygen absorbers and desiccant in the same container unless they are separated by a significant about of space. They will counteract each other when used in close proximity.
 Decision #5: How will you seal your Mylar bags?
Popular methods include using a clothing iron, a flat iron for hair, or a sealing tool made for Mylar. An ordinary household iron or flat hair iron can be used to seal Mylar bags without damaging the iron as long as the user is careful not to overheat the Mylar bag. However, Mylar Bag Sealers which are designed for this purpose are easier to use, faster, and they provide a more reliable seal than does a household iron.
Electric Mylar bag heat-sealers come in various forms, but the most popular is the ‘HotJaw‘ sealer. Notwithstanding, our recommendation is to use an impulse sealer such as the ShieldPro FS-305 or the AIE 305. These are a bit more expensive than the HotJaw but they seal bags faster and more uniformly. In one-step, these impulse sealers can close a bag that is up to 12-inches wide.
A 1-gallon Mylar bag typically has a 10-inch mouth, so if you are buying an impulse sealer, get one that has a 12-inch or larger sealing surface.
For those who are willing to try what appears to be an imported knockoff, the iHotTools 12 purports to be comparable to the ShieldPro, but we’ve not tested that claim.
Regardless of which device you select, check to make sure that it is able to effect a 3/16-inch (5mm) seal, has a heat adjustment that allows it to operate at temperatures ranging from 300-425-degrees, and is able to seal a 7 mil Mylar bag. (Two layers of 7 mil bag layers = 14 mils, so the specification on the product must indicate that the device is able to accommodate this thickness.)
Inexpensive bag sealers can work fine but tend to have narrow jaws so they must be used multiple times on the same Mylar bag. These often require three parallel seals on the same bag to ensure that a sufficient seal has been achieved. They may also not provide uniform heat along the sealing edge, and the unit itself may not last as long as a professional-grade sealer.
Notwithstanding, a Mylar bag can be sealed using an ordinary clothing iron, but it does require a little practice to produce a leak-proof seal consistently. For those without prior experience, 5-mil Mylar bags may deliver the best compromise between the durability of materials and an easy sealing process when using a household iron. Regardless of the thickness of the Mylar bags that you select, expect to forfeit a few bags to practice.
To validate your sealing skill, fill a Mylar bag with air and then seal it. Next, let it cool, then put a heavy book on top of the sealed bag. Recheck it the following day to see if it has leaked any air. Note: The seals on your bags don’t need to be ‘pretty,’ but they do need to be leak-free. Practice until you can consistently produce an airtight seal.
How Will You Store Your Mylar Bags of Food?
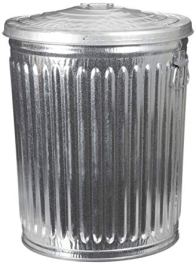 Steel Storage Container (Recommended)
For most people, a new, heavy-duty 20 or 32-gallon galvanized trash can, or a used 30-55 gallon food-grade steel drum, or a new 55-gallon steel drum. Drums are most space-efficient for Mylar bag food storage, but they must have a full-size steel lid and utilize a bolt or clamp-lock band to seal it.
However, if you use 7-mil Mylar bags, you can store them in any container that is inert (doesn’t give off gasses, etc., such as standard plastics) and has not been previously used to store anything that is unhealthy.
Steel drums are the most space-efficient storage method for 1-quart to 1-gallon size Mylar food bags. Other containers may work fine if they are constructed of steel, are food safe, have not been previously used for storing unhealthy substances, and are galvanized or painted with food-safe rust inhibiting treatment. Of course, Mylar bags can be stored on a pantry shelf or in a plastic bin, too, but steel containers are necessary to protect food from rodents. Storage rooms and sheds are not rodent proof.
Don’t put your emergency food supply at risk. Even if you have never had rodent or water problems, don’t assume that this will always be the case during the many years that your food supply may be stored. Keep your food bags off the floor, and if possible, with airflow and cool, but not freezing temperatures, in a low-traffic area that is discrete (to keep the existence of your supplies confidential), and secure from damage and pilfering.
Remember to include measuring cups and utensils, cookware, camp stove, and recipe books designed for these foods, with your emergency food supply. Do not store fuel with your food.
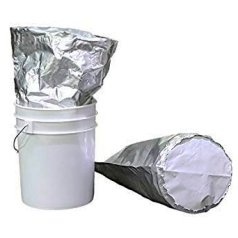 Plastic Food-Grade Buckets – 5 or 6-gallon (Not Recommended)
Though these buckets are very popular for storing Mylar food bags, they are inefficient unless they are used with a single 5-gallon Mylar bag or “stacker” bags designed for use in 5-6 gallon buckets. And, the buckets require far more storage space than most other options. Since they are round and lack sufficient structural strength and stability, they should not be stacked more than three buckets high. Beyond this, if you need to transport them in a vehicle, their space inefficiency translates into not being able to move as much food as totes (below).
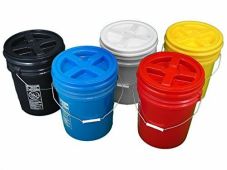 Nevertheless, food-grade buckets with screw-top Omega lids are very popular for food storage. But for the price-conscious, inexpensive food-grade buckets and lids can be purchased at Tractor Supply and home improvement stores such as Home Depot and Lowes. These don’t have Omega lids, but these can be purchased online separately if that feature is important to you.
Regardless, the most significant drawback is that none of these plastic buckets are rodent-proof. Mice, rats, squirrels, and other critters can knaw through the plastic of even “rodent-proof” plastic buckets. It’s happened to us, so this isn’t just theoretical.
Even if you don’t have a rodent problem now, stored food is rarely inspected as often as it should be, especially the back side of the buckets. So, unobserved problems can develop that bring catastrophic consequences. Plastic containers are a gamble when it comes to food storage.
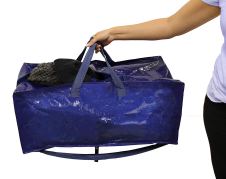 Collapsable Totes
These come in many forms and are made from an assortment of materials and for various purposes. Typically sold as book bags, grocery bags, blanket bags, car trunk (boot) bags, etc., they come in many sizes. It’s easy to find a style, shape, and size to fit the Mylar bags you are using.
For example, the extra-large Heavy-Duty Earthwise Storage Tote which measures 29″L x 12″H x 13.5″D, is inexpensive, can support a 50-pound load, and can hold six 1-gallon Mylar bags filled with food. Importantly, due to its rectangular shape and flexible sides, it is space efficient. And when it comes to transport, when packed into vehicle or trailer it can be adjusted to fit the available space. Since it has both handles and backpack straps, a tote such as this can also be carried longer distances than a bucket.
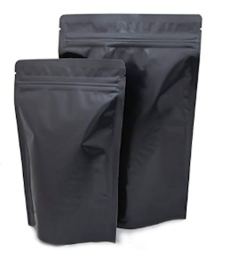 How much food will fit in a Mylar bag? What Foods to Choose?
What foods are best? How many Mylar bags are needed for the amount of food you want to package? How many pounds of food can be packed into a Mylar bag or a 5-gallon bucket?
The following table contains the Top-10 healthy dry foods to package in Mylar bags. And, to help you purchase the number of bags you will need for this D-I-Y project, it also includes an estimate of the number of pounds of food which will fit into the three most popular sizes of Mylar bags.
Understand, this is not a complete list of all the foods you should stockpile. At the very least, we recommend that your emergency food larder also includes Mylar packaged or #10 cans of other freeze-dried or dehydrated foods including, dehydrated or freeze-dried (best) vegetables, fruit, sugar, salt, and other spices. Plus, other sources of complex protein and fats such as canned fish and meats. (Grocery-store cans of fish and meat should be used or donated, and replaced every 3-5 years.)
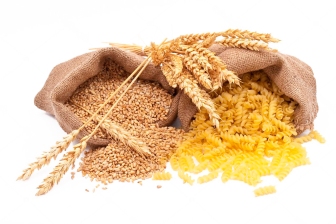 Best Food Choices for Mylar Bags
The Top-12 Emergency Foods for D-I-Y Long Shelf-LIfe (25-35 year) Food Storage Projects
These are the foods we recommend as the place to start your D-I-Y food packing project. It is not necessary to pack all 12, but do pick several different types of beans, legumes, and white rice or another carbohydrate. Again, this is just the place. The foods on this list exceed the World Health Organization’s basic nutrition recommendations.
| From this list of top nutritional choices, select your favorite beans, legumes, and carbs.* | 1-Gallon Mylar Bag | 1.5-Gallon Mylar Bag | 5-Gallon Mylar Bag | Calories per Cup** |
| Anasazi Beans | 6.8 lbs. | 10.25 lbs. | 34.2 lbs. | 280 calories |
| Black Beans (Turtle Beans) | 7 | 10.5 | 35 | 227 |
| Chickpeas (aka / Garbanzo Beans) | 6.7 | 10 | 33.3 | 269 |
| Green Peas | 6.7 | 10 | 33.3 | 125 |
| Kidney Beans | 6.7 | 10 | 33.3 | 215 |
| Lentils | 7.2 | 10.7 | 35.8 | 230 |
| Navy Beans (White Beans) | 7.5 | 11.2 | 37.5 | 255 |
| Pinto Beans | 6.8 | 10.2 | 34.2 | 245 |
| Soybeans | 6.7 | 10 | 33.3 | 298 |
| White Rice | 7.3 | 11 | 36.7 | 206 |
| Wheat Berries | 6-7.5 | 9-11.5 | 29-37.5 | 300 |
| Dehydrated or Freeze-Dried Carrots | 3.3 | 5 | 16.7 | 288 |
* With Emergency Food Storage the goal is to stockpile a variety of healthy foods which will deliver a balanced, nutritional diet. Also, a factor most people forget is that it needs to be high-calorie foods, too, as stress and physical activity require a higher intake of calories. Fat is needed, as well, but unfortunately, foods containing fats, oils, and high moisture content all have a significantly reduced shelf-life. Therefore, they are not a good choice for D-I-Y Mylar food packaging. (Typically, these have an 85% shorter shelf-life.)
Remember, though calories are often avoided in normal times, during an emergency situation or time of physical hardship, calories produce needed energy, so this need must be taken into account. As a point of reference, the U.S. Department of Defense has determined that warriors need to consume at least 3,600 calories per day. For more on nutrition during an emergency situation, read “Prepared, Ready to Roll: Evacuation, Safe-Haven Selection, and Shelter-in-Place Guidebook,” by SIG Swanstrom.
** The information contained in these charts are estimates.
Note: One cup of dehydrated food will often become 2-3 cups of eatable food after it is hydrated, so take this into account as you consider per-day quantities. For example, 100 grams of fresh apricots contains about 50 calories, but 100 grams of dried apricots has 5x that amount (260 calories). It’s better to stockpile too many calories than too few.
Note: Food that has been freeze-dried retains nearly the same nutritional value and calorie content as fresh food, whereas dehydrated foods lose significant nutritional value in the drying process but generally not the calories. The amount of nutritional loss created by dehydrating will vary according to the drying method.
All foods lose nutritional value the longer they are stored, but maintaining a food supply at a constant, low temperature without freezing/thawing/refreezing, will extend its shelf-life. Storage temperatures above 75-degrees will significantly diminish the nutritional value of stored food but not necessarily its shelf-life. So, when Mylar packaged food is eaten 35-years after it was packaged, it can still be safe and healthy, but it will not have the same nutritional value as fresher food.
Other Popular Foods for Packing in Mylar Bags*
| Food Type and Volume | 1-Gallon | 1.5-Gallon | 5-Gallon |
| White Rice | 7.3 lbs. | 11 lbs. | 36.7 lbs. |
| Potato Flakes | 2.5 | 3.7 | 12.5 |
| Rolled Oats | 4 | 6.2 | 20.8 |
| Wheat Berries | 6-7.5 | 9-11.5 | 29-37.5 |
| Carrots, Diced | 3.3 | 5 | 16.7 |
| Corn, Whole | 7.5 | 11.2 | 37.5 |
| Green Peas (Split Peas) | 6.7 | 10 | 33.3 |
| Flour, All Purpose (+/- 5 yr. shelf-life) | 6.7 | 10 | 33.3 |
| Pasta, Egg Noodles (require 7-mil bags) | 2.6 | 4 | 13.3 |
| Pasta, Macaroni (require 7-mil bags) | 4.2 | 6.2 | 20.8 |
| Pasta, Spaghetti (require 7-mil bags) | 5.8 | 8.7 | 29.1 |
| Milk, Dry Nonfat (+/- 5 yr. shelf-life) | 5.8 | 8.7 | 29.1 |
| Cheese, Powdered (+/- 5 yr. shelf-life) | 4.1 | 6.2 | 20.8 |
| Apple Slices (+/- 5 yr. shelf-life) | 1.6 | 2.5 | 8.3 |
| Onions, Chopped | 3 | 4.5 | 15 |
| Sugar, Granulated | 7 | 10.5 | 35 |
| Salt, Granulated (space required varies by moisture content) | 10.1 | 15 | 50 |
| Peppercorns (peppers, and other raw spices) | 10.3 | 15.7 | 52.3 |
* The quantities indicated here are only estimates, provided to help you order the number of Mylar bags you will need for your food packing project. The above list is not nutritionally complete, nor does it represent the foods we recommend that you stockpile. It is merely a list of favorite foods that are often packed in Mylar bags. Also, these foods do not have the same shelf-life, nor are they all equally beneficial for nutritional health. For more on these topics, visit 36Ready.com.
** One cup of dehydrated food will often become 2-3 cups of eatable food after it is hydrated.
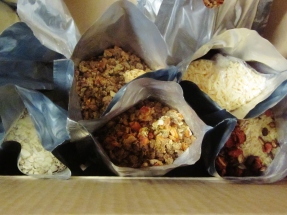 Pre-Made Meals: Packing complete Emergency Mylar-bag Meals suitable for short-term and long-term storage
Mylar Bag D-I-Y Individual Meals. These can be assembled and used as both a short-term and long-term food storage solution. Short-term, they can be used during any local disaster or emergency situation. Long-term, they can be stockpiled and used when mobility is important, and you don’t have easy access to your bulk food supplies.
Components of a D-I-Y Emergency Meal: For a single meal, use a 1-quart 5-7 mil gusseted Mylar bag, and add the premixed ingredients required to make a complete meal made of dried foods.
Cook-in-Bag Option: By leaving extra space in the bag for the water needed to prepare the meal, the food in this Mylar bag can be cooked without a pot. For a single meal, use a 1-quart Mylar bag. If you want to make a family-size meal, you will need to experiment with portion size.
Boiling Water: Genuine Mylar bags can be filled with boiling water. However, do not put the Mylar bag directly over a flame or next to a heat source.
Assembling D-I-Y Portable Emergency Meals: Use a larger bag than is necessary for the food itself; it needs to be able to accommodate the dry food plus the water which will be added later to hydrate the meal. Before the bag is sealed at the top, roll the top of the bag to remove as much of the air as possible, add extra oxygen absorbers to counteract the additional space in the bag, then heat-seal the top edge of the bag. Reminder: Label the bag with a reminder to the user, that they need to remove the (exact number of) oxygen absorber packets before filling the bag with hot water.
Food Choice: A meal such as this might include rice and a handful of freeze-dried vegetables and some spices. Though not required unless you want to prepare the meal without the use of a cookpot, when the bag is large enough to accommodate the water needed to rehydrate and heat the food, you have a meal that is both easy to prepare and also eat on the run.
Recipe: Most people favor using a 1-quart gusseted Mylar bag to which they add 1-cup of white rice and 1/4 cup of freeze-dried vegetables purchased in bulk, plus their favorite seasoning spices. Or, they add two servings from a dehydrated vegetable soup mix.
Meat Option: Some also insert a 3-ounce can of tuna or meat into the Mylar bag before they seal it. Then, when it comes time to use this bag of emergency food, they will add this protein to the meal once it is hydrated. If the can is swollen when they open the bag they will discard it, but if they open the can of fish/meat and it smells normal, they will add it to the meal to make it more interesting and nutritious. These meals are also popular with those who enjoy backpacking.
How to Use: Remove any extra packets of supplemental foods or flavorings. Boil or heat water in a separate container, and carefully pour the hot water into the Mylar bag. Stir the contents to make sure that all the food is exposed to water. Add spices or flavoring, if available. Then, close the bag to minimize cooling, and wait ½ hour before tasting it to see if it’s ready. If it’s not fully hydrated after 30-minutes, stir it again, close the top, and wait a few more minutes before eating.
Caution: The contents will be extremely hot, so carefully prop the food bag before you fill it with hot water. Plan ahead, so you don’t need to hold the bag while filling it, nor during the time required to hydrate the meal. If you use a gusseted style Mylar bag for these Emergency Meals, it is easier to keep the bag upright without handling it.
Other Supplies Needed for this Packing Project
> Glass Jars to Protect Oxygen Absorbers and Desiccant Packets. Three or more glass jars, such as canning jars, will be needed for this project. Each jar needs to have a tightly fitting metal lid and a rubber-like seal (gasket).
Once the shipping package of oxygen absorbers is opened, they will immediately start to pull oxygen out of the air. This activation isn’t unhealthy for us, but it does create a problem. The useful life of these packets quickly diminishes if they are not quickly placed into airtight containers, such as jars with tightly sealed lids.
How many jars are needed? As many as necessary to store the number of absorbers purchased. Use one jar to hold the packets which you will use in the first two hours of your packing project, the rest in another jar(s). After removing the packets needed for the bag you have just filled, quickly reseal the jar to protect the remaining oxygen absorbers. Use one jar at a time as every time a jar is opened, it will admit fresh air to the jar, and the packets will immediately activate, and start working to remove the oxygen from that new supply of air.
Desiccant packets should be similarly protected. But, since their activation and exhaustion is not as rapid as that of oxygen absorbers, they do not require the same level of diligence in pre-pack handling.
> Table or smooth work surface in a clean area.
>Measuring cup or kitchen scale. Either of these can be used to help fill the bag with the intended quantity of food. Accurate measurement is important for accurately labeling each bag with the amount of food it contains.
> Black Felt pen or Sharpie. Use a permanent marker pen to print on each bag, labeling it with its contents and quantity. Note: Over time, black ink will fade less than other colors of ink.
Packing Tape, Paper, and Scissors. Use a high quality, clear, 2-inch wide heavy-duty packing tape. This will be used to protect the label from wear and smudging. Note: This process will likely use more tape than you might expect. If you follow the labeling method we recommend in this article, you will use one roll of this 3M tape for every 38 bags packed.
Rotation of Food Supplies
Use and replace your food supplies on a regular basis. Or, at the very least, annually open a bag(s) of food and prepare it, to make sure your food supply has remained fresh and your heat-seals effective. Set a schedule; use calendar reminders to inspect your food supply for damage or problems. To test a bag’s seal, squeeze it gently and listen for escaping air. If you hear a hiss, the seal has failed.
Even though many of these foods can have a 35+-year shelf-life, after five years, we recommend initiating an annual cycle of replacement. Replace at least 20% of your emergency food supply annually – or, add new supplies annually that are equivalent to an additional 3-month supply of food. If you have sufficient storage space, add these fresh supplies to the food that you previously stored. This will not only increase your available quantities, but it will also allow you store food that you can later donate to those in need.
With this rotation process, don’t discard food that old but appears to be unspoiled. During an extended emergency situation, you may need it. At the very least, when the need arises, donate these older food stocks to neighbors who are in need. Food banks will rarely accept food that is D-I-Y packaged, but during a disaster or emergency situation, churches will often welcome these donations.
Maintain a 1-2 year supply of nutritionally balanced food at your home or safe-haven retreat location.
This may seem like a daunting task, so start with a 3-month supply, then add another 3-months, and continue this process until you have what you need. Strive to make each 3-month supply nutritionally balanced and complete as a stand-alone supply. And, don’t forget to stockpile what will be needed to cook your food without grid-supplied electrical power, and mundane items such as cookbooks, as well as critical items such as what is needed to purify water and the other equipment required for independent living.
As you plan your food supply, keep in mind, too, that during an emergency situation you will likely have family members and friends arrive at your doorstep. They will be looking for help. How will you handle this? Are you going to help them in their time of need? If so, plan for this need, as well.
If you do not plan to help others, then you will need to evacuate early to a rural safe-haven location that others don’t know about. Even if you are generous and are determined to help others, understand that the demand for food and other supplies will quickly surpass the resources of kind neighbors, charitable organizations, and government services. More to the point, anything other than a short-term emergency will overwhelm your ability to help others. So you, too, need to plan for early evacuation. Evacuate early to a well-stocked safe-haven location that is at least a 2-hour drive from an urban area. That is where your long-term food supply should be securely stored.

One thought on “Mylar Bags: Selecting the Best Mylar Products to Purchase”
Comments are closed.